Prometheus监控系统

Prometheus [prəˈmi:θi:əs, -ˌθju:s] 是由SoundCloud使用Go语言开发的开源监控报警系统和时间序列数据库(TSDB)。Prometheus于 2016 年加入 云原生计算基金会(CNCF),作为继Kubernetes之后的第二个托管项目,因为kubernetes的流行带动了prometheus的发展。

什么是时间序列数据?

时间序列数据(TimeSeries Data):按照时间顺序记录系统、设备状态变化的数据被称为时序数据。

应用的场景很多, 如:

  • 无人驾驶车辆运行中要记录的经度,纬度,速度,方向,旁边物体的距离等等。每时每刻都要将数据记录下来做分析。
  • 某一个地区的各车辆的行驶轨迹数据
  • 传统证券行业实时交易数据
  • 实时运维监控数据,CPU、内存等实时数据

时间序列数据特点:

  • 性能好

关系型数据库对于大规模数据的处理性能糟糕。NOSQL可以比较好的处理大规模数据,让依然比不上时间序列数据库。

  • 存储成本低

高效的压缩算法,节省存储空间,有效降低IO Prometheus有着非常高效的时间序列数据存储方法,每个采样数据仅仅占用3.5byte左右空间,上百万条时间序列,30秒间隔,保留60天,大概花了200多G(来自官方数据)

  • 多维度数据模型
  • 灵活的查询语言
  • 不依赖分布式存储,单个服务器节点是自主的
  • 以HTTP方式,通过pull模型拉去时间序列数据
  • 也可以通过中间网关支持push模型
  • 通过服务发现或者静态配置,来发现目标服务对象
  • 支持多种多样的图表和界面展示

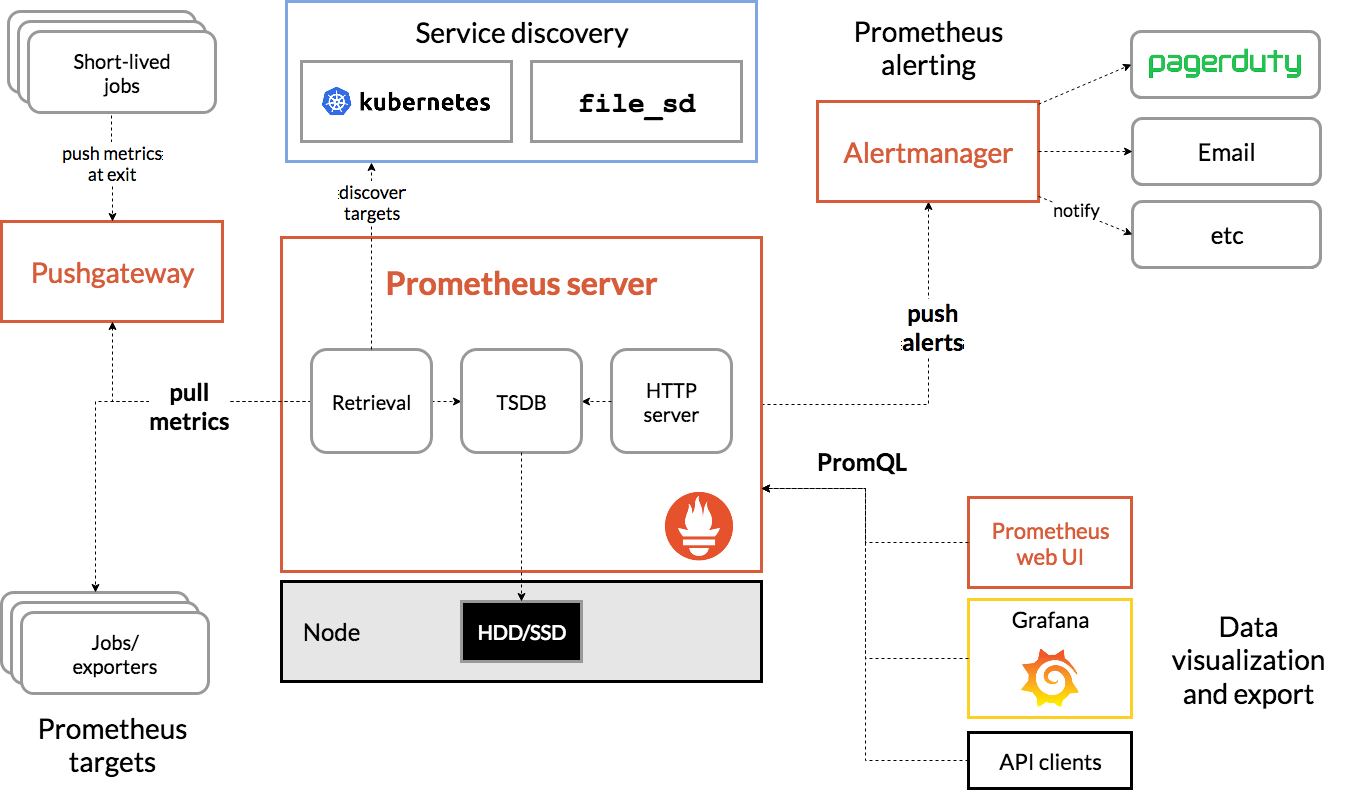
Prometheus [prəˈmi:θi:əs, -ˌθju:s] 的基本原理是使用 Pull (抓取)的方式,通过HTTP协议周期性抓取被监控组件的Metrics 数据(监控指标数据),然后,再把这些数据保存在一个 TSDB (时间序列数据库,比如 OpenTSDB、InfluxDB 等)当中,任意组件只要提供对应的HTTP接口就可以接入监控。不需要任何SDK或者其他的集成过程。这样做非常适合做虚拟化环境监控系统,比如VM、Docker、Kubernetes等。

https://s2.loli.net/2022/01/05/HIVSlpnvZYfbcGD.png

  • Prometheus Server:主要用于抓取数据和存储时序数据,在该组件上配置监控数据的采集和告警规则.
  • Push Gateway: 主要用于短期的 jobs。由于这类 jobs 存在时间较短, 可能在 Prometheus 来 pull 之前就消失了。为此, 这类jobs 可以直接向 Prometheus server 端推送它们的 metrics. 这种方式主要用于服务层面的 metrics, 对于机器层面的 metrics, 需要使用 node exporter.
  • Exporter: 是 Prometheus的一类数据采集组件的总称,用于暴露已有的第三方服务的 metrics 给Prometheus。 它负责从目标处搜集数据, 并将其转化为Prometheus支持的格式. 与传统的数据采集组件不同的是, 它并不向中央服务器发送数据, 而是等待中央服务器主动前来抓取.
  • AlertManager: 用于接收promethues发出的告警做进一步处理,对告警进行聚合、下发、抑制等。常见的告警方式有:邮件,钉钉,webhook 等一些其他的工具。
  • Grafana: 第三方数据图表展示工具
  • Service Discovery: 动态发现待监控的Target,从而完成监控配置的重要组件,在容器化环境中尤为有用;该组件目前由Prometheus Server 内建支持。

每个组件都是独立工作的,不依赖其他组件。不同模块组件之间通过配置文件关联到一起,实现整个监控的功能。每个独立的模块都可以扩展,做高可用方案。

https://prometheus.io/download/ 下载相应版本,安装到服务器上官网提供的是二进制版,解压就能用,不需要编译

 1
 2
 3
 4
 5
 6
 7
 8
 9
10
$ tar xf prometheus-2.5.0.linuxamd64.tar.gz -C /usr/local/
$ mv /usr/local/prometheus-2.5.0.linuxamd64/ /usr/local/prometheus
# 直接使用默认配置文件启动
$ /usr/local/prometheus/prometheus --config.file="/usr/local/prometheus/prometheus.yml" --web.enable-lifecycle &
# 启动时加上--web.enable-lifecycle启用远程热加载配置文件
# 调用指令是curl -X POST http://localhost:9090/-/reload
# 确认端口(9090)
$ lsof -i:9090
COMMAND     PID USER   FD   TYPE  DEVICE SIZE/OFF NODE NAME
prometheu 85396 root    8u  IPv6 2258519      0t0  TCP *:websm (LISTEN)

通过浏览器访问http://服务器IP:9090就可以访问到prometheus的主界面,点击Status –>点Targets –>可以看到只监控了prometheus server本机

https://s2.loli.net/2022/01/05/5P6S32ilBuEf8WA.png

访问http://10.101.1.51:9090/metrics可以查看到prometheus提供的自身 相关的metrics(指标)数据

 1
 2
 3
 4
 5
 6
 7
 8
 9
10
11
12
13
14
# HELP go_gc_duration_seconds A summary of the pause duration of garbage collection cycles.
# TYPE go_gc_duration_seconds summary
go_gc_duration_seconds{quantile="0"} 3.6816e-05
go_gc_duration_seconds{quantile="0.25"} 5.924e-05
go_gc_duration_seconds{quantile="0.5"} 9.4932e-05
go_gc_duration_seconds{quantile="0.75"} 0.000144405
go_gc_duration_seconds{quantile="1"} 0.001375254
go_gc_duration_seconds_sum 0.036465283
go_gc_duration_seconds_count 270
# HELP go_goroutines Number of goroutines that currently exist.
# TYPE go_goroutines gauge
go_goroutines 31 
...
...

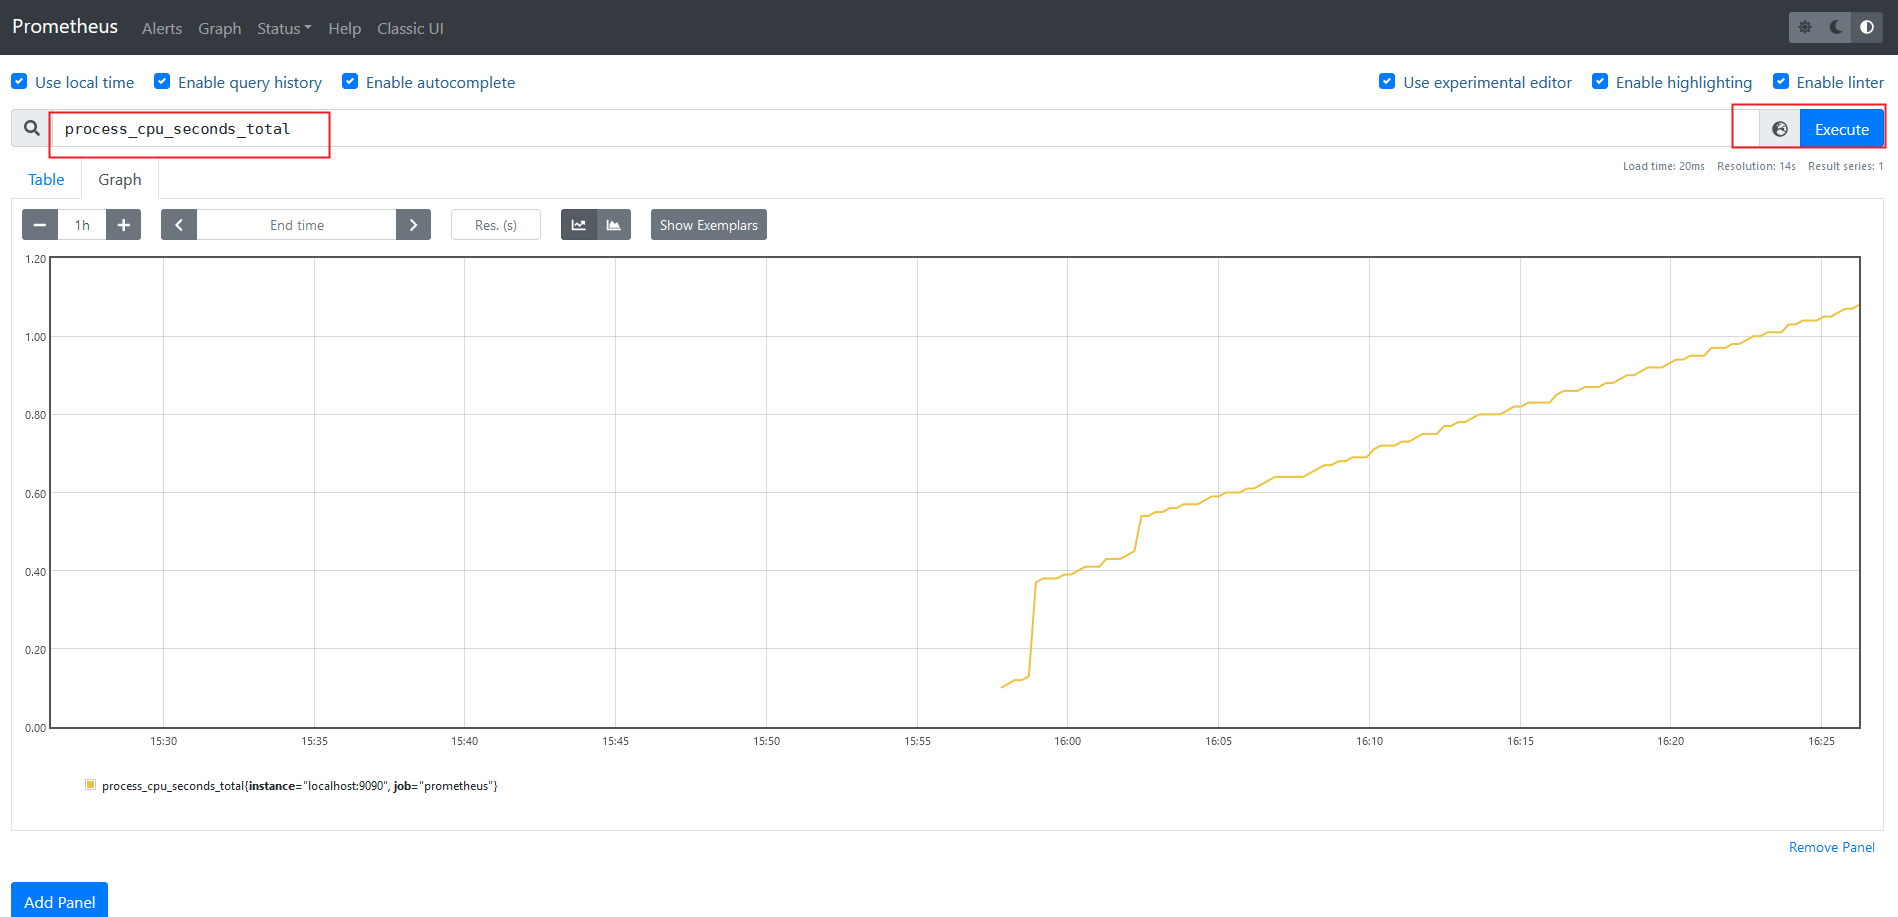
在主界面可以通过关键字查询监控项

https://s2.loli.net/2022/01/05/SqU1DWgwfhXbB3E.png

 1
 2
 3
 4
 5
 6
 7
 8
 9
10
$ tar xf node_exporter-0.16.0.linuxamd64.tar.gz -C /usr/local/
$ mv /usr/local/node_exporter-0.16.0.linuxamd64/ /usr/local/node_exporter
# 里面就一个启动命令node_exporter,可以直接使用此命令启动
$ ls /usr/local/node_exporter/
LICENSE node_exporter NOTICE
$ nohup /usr/local/node_exporter/node_exporter &
# 确认端口(9100)
$ lsof -i:9100
COMMAND     PID USER   FD   TYPE  DEVICE SIZE/OFF NODE NAME
node_expo 83747 root    3u  IPv6 2272614      0t0  TCP *:jetdirect (LISTEN)
  • 通过浏览器访问http://被监控端ip:9100/metrics 就可以查看到node-exporter在被监控端收集到的信息
 1
 2
 3
 4
 5
 6
 7
 8
 9
10
11
12
13
14
15
16
17
# HELP go_gc_duration_seconds A summary of the pause duration of garbage collection cycles.
# TYPE go_gc_duration_seconds summary
go_gc_duration_seconds{quantile="0"} 7.0401e-05
go_gc_duration_seconds{quantile="0.25"} 7.0401e-05
go_gc_duration_seconds{quantile="0.5"} 0.001011446
go_gc_duration_seconds{quantile="0.75"} 0.001011446
go_gc_duration_seconds{quantile="1"} 0.001011446
go_gc_duration_seconds_sum 0.001081847
go_gc_duration_seconds_count 2
# HELP go_goroutines Number of goroutines that currently exist.
# TYPE go_goroutines gauge
go_goroutines 8
# HELP go_info Information about the Go environment.
# TYPE go_info gauge
go_info{version="go1.16.7"} 1
# HELP go_memstats_alloc_bytes Number of bytes allocated and still in use.
# TYPE go_memstats_alloc_bytes gauge
  • 回到prometheus服务器的配置文件里添加被监控机器的配置段
 1
 2
 3
 4
 5
 6
 7
 8
 9
10
# 在yml文件的最后添加被监控器的配置段
$ vim /usr/local/prometheus.yml

  - job_name: "node-exporter"			# 添加新的监控项
    static_configs:
      - targets: ["10.101.1.53:9100"]

# 修改完成后重新加载配置文件
$ curl -X POST http://localhost:9090/-/reload
level=info ts=2021-10-15T08:41:40.889Z caller=main.go:1016 msg="Completed loading of configuration file" filename=/usr/local/prometheus/prometheus.yml
  • 回到web界面查看targets,可以看到多了一台监控目标

https://s2.loli.net/2022/01/05/g2MRHy37hzsKVPm.png

 1
 2
 3
 4
 5
 6
 7
 8
 9
10
11
12
13
14
15
16
17
18
19
20
21
22
23
24
25
26
27
28
# 安装mysqld_exporter组件
[root@agent1 ~]# tar xf mysqld_exporter-0.11.0.linuxamd64.
tar.gz -C /usr/local/
[root@agent1 ~]# mv /usr/local/mysqld_exporter-0.11.0.linux-amd64/ /usr/local/mysqld_exporter
[root@agent1 ~]# ls /usr/local/mysqld_exporter/
LICENSE mysqld_exporter NOTICE
# 安装mariadb数据库,并授权
[root@agent1 ~]# yum install mariadb\* -y
[root@agent1 ~]# systemctl restart mariadb
[root@agent1 ~]# systemctl enable mariadb
[root@agent1 ~]# mysql
MariaDB [(none)]> grant select,replication client,process ON *.* to 'mysql_monitor'@'localhost' identified by '123';
(注意:授权ip为localhost,因为不是prometheus服务器来直接找mariadb获取数据,而是prometheus服务器找mysql_exporter,mysql_exporter再找mariadb。所以这个localhost是指的mysql_exporter的IP)
MariaDB [(none)]> flush privileges;
# 查询权限授予的表
MariaDB [(none)]> select * from mysql.user \G;
MariaDB [(none)]> quit
# 创建一个mariadb配置文件,写上连接的用户名与密码(和上面的授权的用户名和密码要对应)
[root@agent1 ~]# vim /usr/local/mysqld_exporter/.my.cnf
[client]
host=127.0.0.1
port=3306
user=mysql_monitor
password=123
# 启动mysqld_exporter
[root@agent1 ~]# nohup /usr/local/mysqld_exporter/mysqld_exporter --config.my-cnf="/usr/local/mysqld_exporter/.my.cnf" &
# 确认端口(9104)
[root@agent1 ~]# lsof -i:9104
  • 回到prometheus服务器的配置文件里添加被监控的mysql的配置端
 1
 2
 3
 4
 5
 6
 7
 8
 9
10
11
12
13
14
15
$ vim /usr/local/prometheus/prometheus.yml
 
- job_name: "mysql-exporter"           # 添加新的监控项
    file_sd_configs:
      - files:
        - ./data/mysql_monitor_discovery.json
# 查看下json中填入的mysql信息
$ cat ./data/mysql_monitor_discovery.json
[
    {
        "targets":[
            "10.101.1.53:9104"	
        ]
    }
]
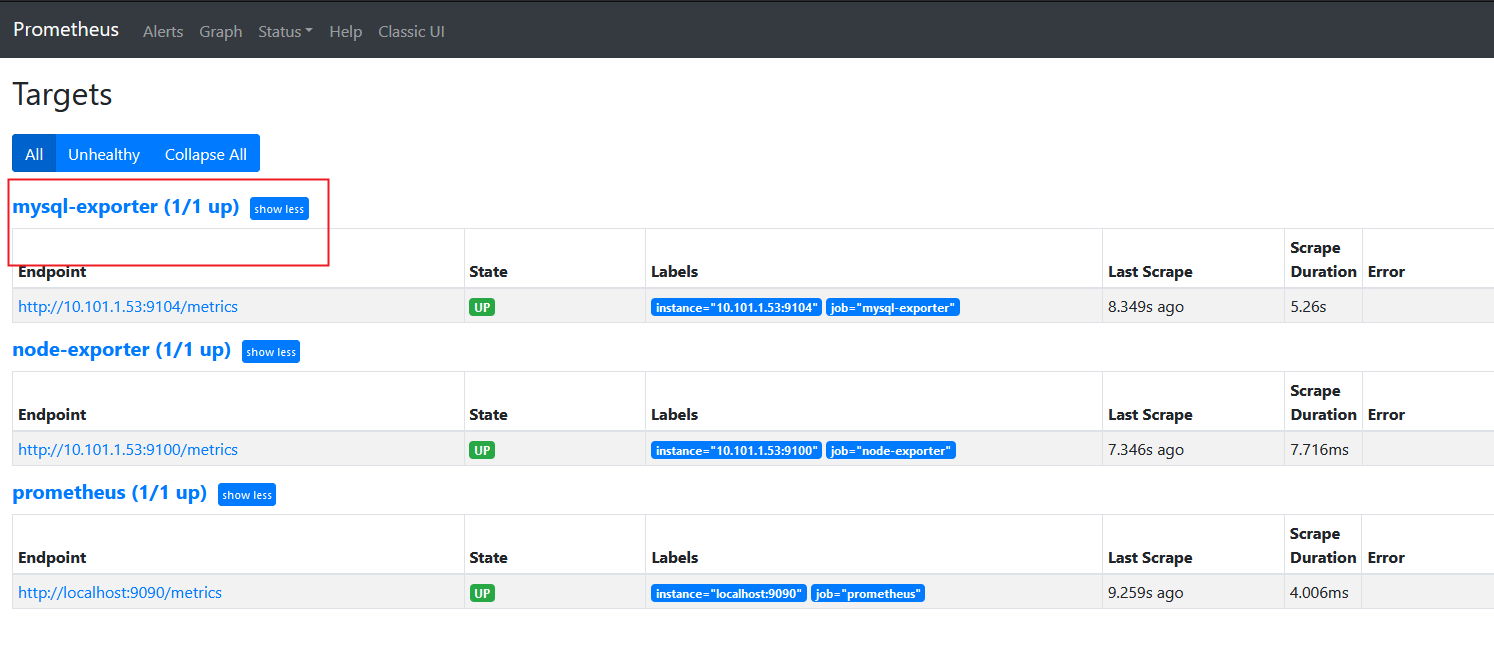
  • 回到web界面查看targets,可以看到多了一台监控目标

https://s2.loli.net/2022/01/05/v4yP8c2pKbFe91Y.png

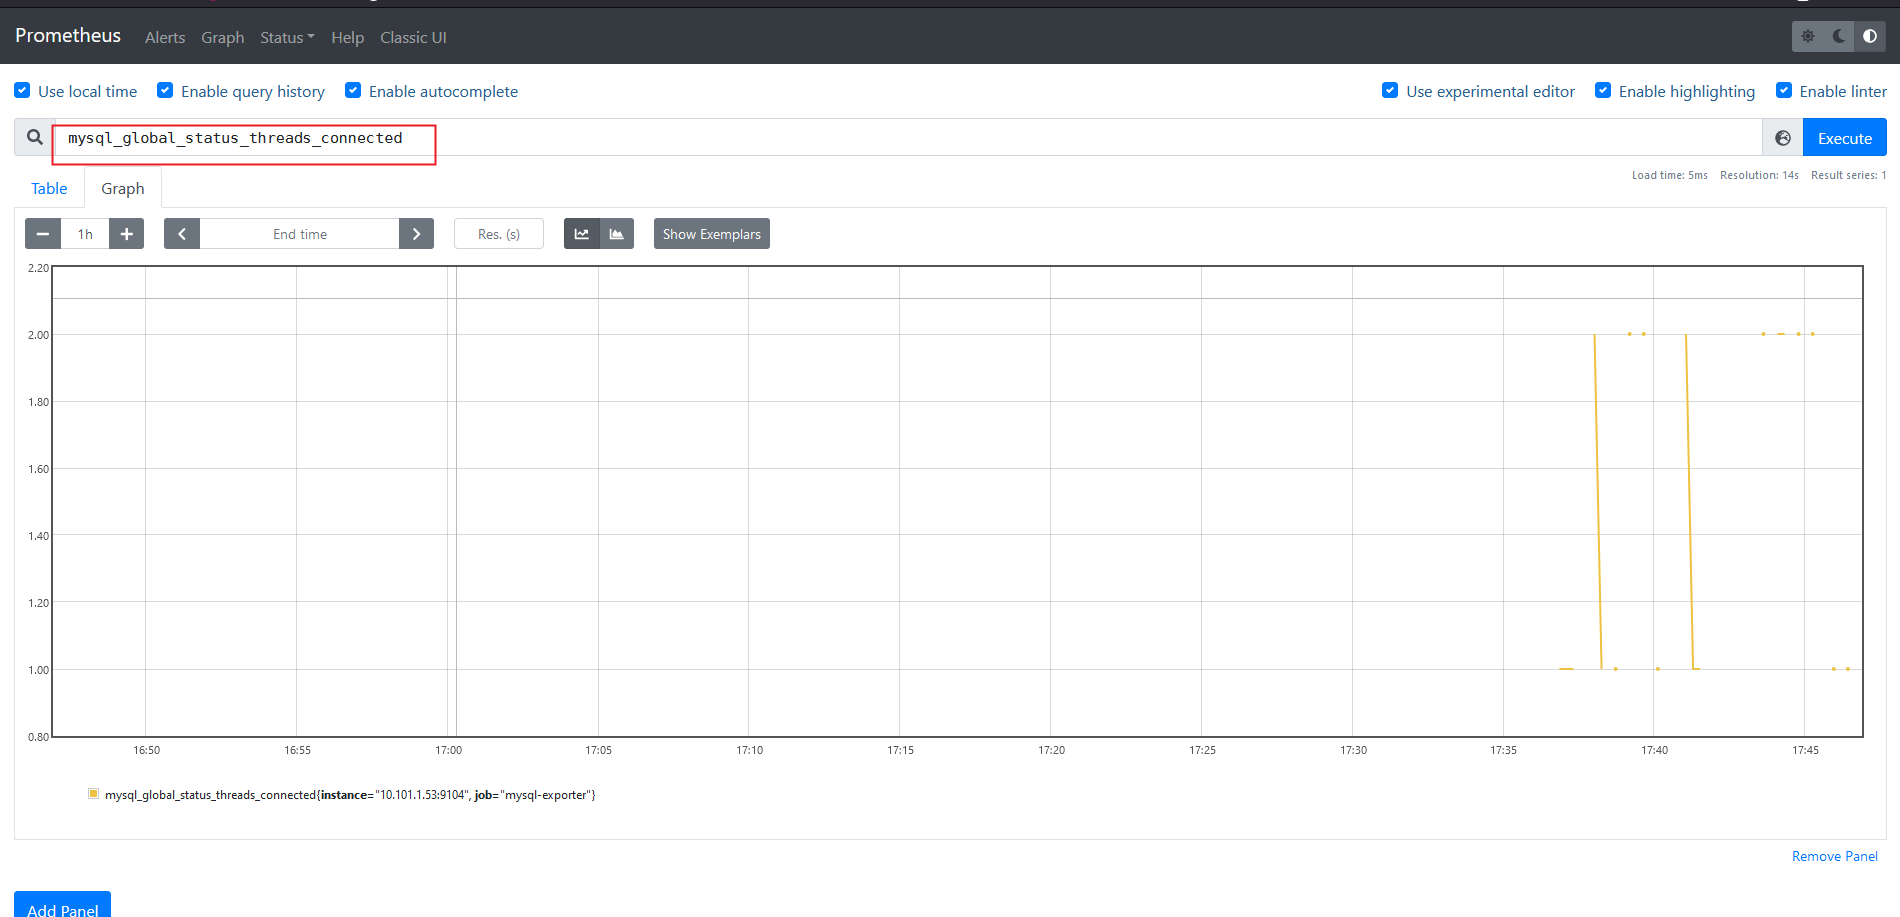
可以查询mysql连接数等信息

https://s2.loli.net/2022/01/05/YoUFLQfJEH9bBTh.png

  • prometheus存储:
1
2
--storage.tsdb.path,prometheus写入tsdb数据库的位置,默认为data/。
--storage.tsdb.retention.time,数据保存天数,默认为15d。

如果您的本地存储因任何原因而损坏,最好的办法是关闭Prometheus并删除整个存储目录。 Prometheus的本地存储不支持非POSIX兼容的文件系统,可能会发生损坏,无法恢复。 NFS只是潜在的POSIX,大多数实现都不是。您可以尝试删除单个块目录以解决问题,这意味着每个块目录丢失大约两个小时的数据时间窗口。同样,普罗米修斯的本地存储并不意味着持久的长期存储。

如果同时指定了时间和大小保留策略,则在该时刻将使用先触发的策略。

  • prometheus主配置文件
 1
 2
 3
 4
 5
 6
 7
 8
 9
10
11
12
13
14
15
16
17
18
19
20
21
22
23
24
25
26
27
28
29
30
31
32
33
34
35
36
37
38
39
$ vim prometheus.yml
# 默认的全局配置
global:
  scrape_interval: 15s			# 抓取metrics指标数据间隔, 15秒向目标抓取一次数据
  evaluation_interval: 15s		# 评估告警规则时间间隔, 每隔5分钟获取一次告警规则,触发告警检测的时间

#抓取相当于是写操作,把指标数据写入tsdb中。评估间隔相当于是读,读取tsdb中的指标给alert,alert根据指标数据去匹配告警规则是否要触发告警

# Alertmanager的配置
alerting:						# AlertManager监控报警配置
  alertmanagers:
    - static_configs:
        - targets:
          # - alertmanager:9093	# alertmanager的服务地址,如127.0.0.1:9093
          
# 一旦加载了报警规则文件,将按照evaluation_interval即15s一次进行计算,rule文件可以有多个
rule_files:						# 告警规则文件配置
  # - "first_rules.yml"
  # - "second_rules.yml"

# scrape_configs为采集配置,包含至少一个job
scrape_configs:					# prometheus与抓取模块交互的接口配置

  - job_name: "prometheus"		# Prometheus的自身监控
    static_configs:
      - targets: ["localhost:9090"]

# 这个job是监控主机的,这个例子中用到了file_sd_configs的功能,就是通过配置文件的方法自动发现配置,之后有新添加的主机,直接维护下面files指定的文件就可以了,在那里面新增主机配置,prometheus会自动的发现并应用,这样做的好处是防止配置文件冗长,里面的文件格式为json格式:[{"targets": ["127.0.0.1:9100"], "labels": {"instance": "test"}},{"targets": ["xx.xx.xx.xx:9100"], "labels": {"instance": "test1"}}]推荐用这样的方法,我们在instance里面可以加上主机的属性来区分不同主机,比如说可以加上机房的区分

# 静态配置的方式
  - job_name: "node-exporter"		# 添加新的监控项
    static_configs:
      - targets: ["10.101.1.53:9100"]
# 服务发现的方式
  - job_name: "mysql-exporter"           # 添加新的监控项
    file_sd_configs:
      #refresh_interval: 1m 		# 刷新发现文件的时间间隔
      - files:
        - ./data/mysql_monitor_discovery.json

Grafana是一个开源的度量分析和可视化工具,可以通过将采集的数据分析,查询,然后进行可视化的展示,并能实现报警

  • 安装grafana
1
2
3
4
5
6
7
8
9
# 我这里选择的rpm包,下载后直接rpm -ivh安装就OK
$ wget https://dl.grafana.com/enterprise/release/grafana-enterprise-8.2.1-1.x86_64.rpm
[root@grafana ~]# rpm -ivh /root/Desktop/grafana-5.3.4-
1.x86_64.rpm
# 启动服务
[root@grafana ~]# systemctl start grafana-server
[root@grafana ~]# systemctl enable grafana-server
# 确认端口(3000)
[root@grafana ~]# lsof -i:3000

访问:http://10.101.1.52:3000,在Configuration中添加DataSource为prometheus的地址

  • 配置dashboard

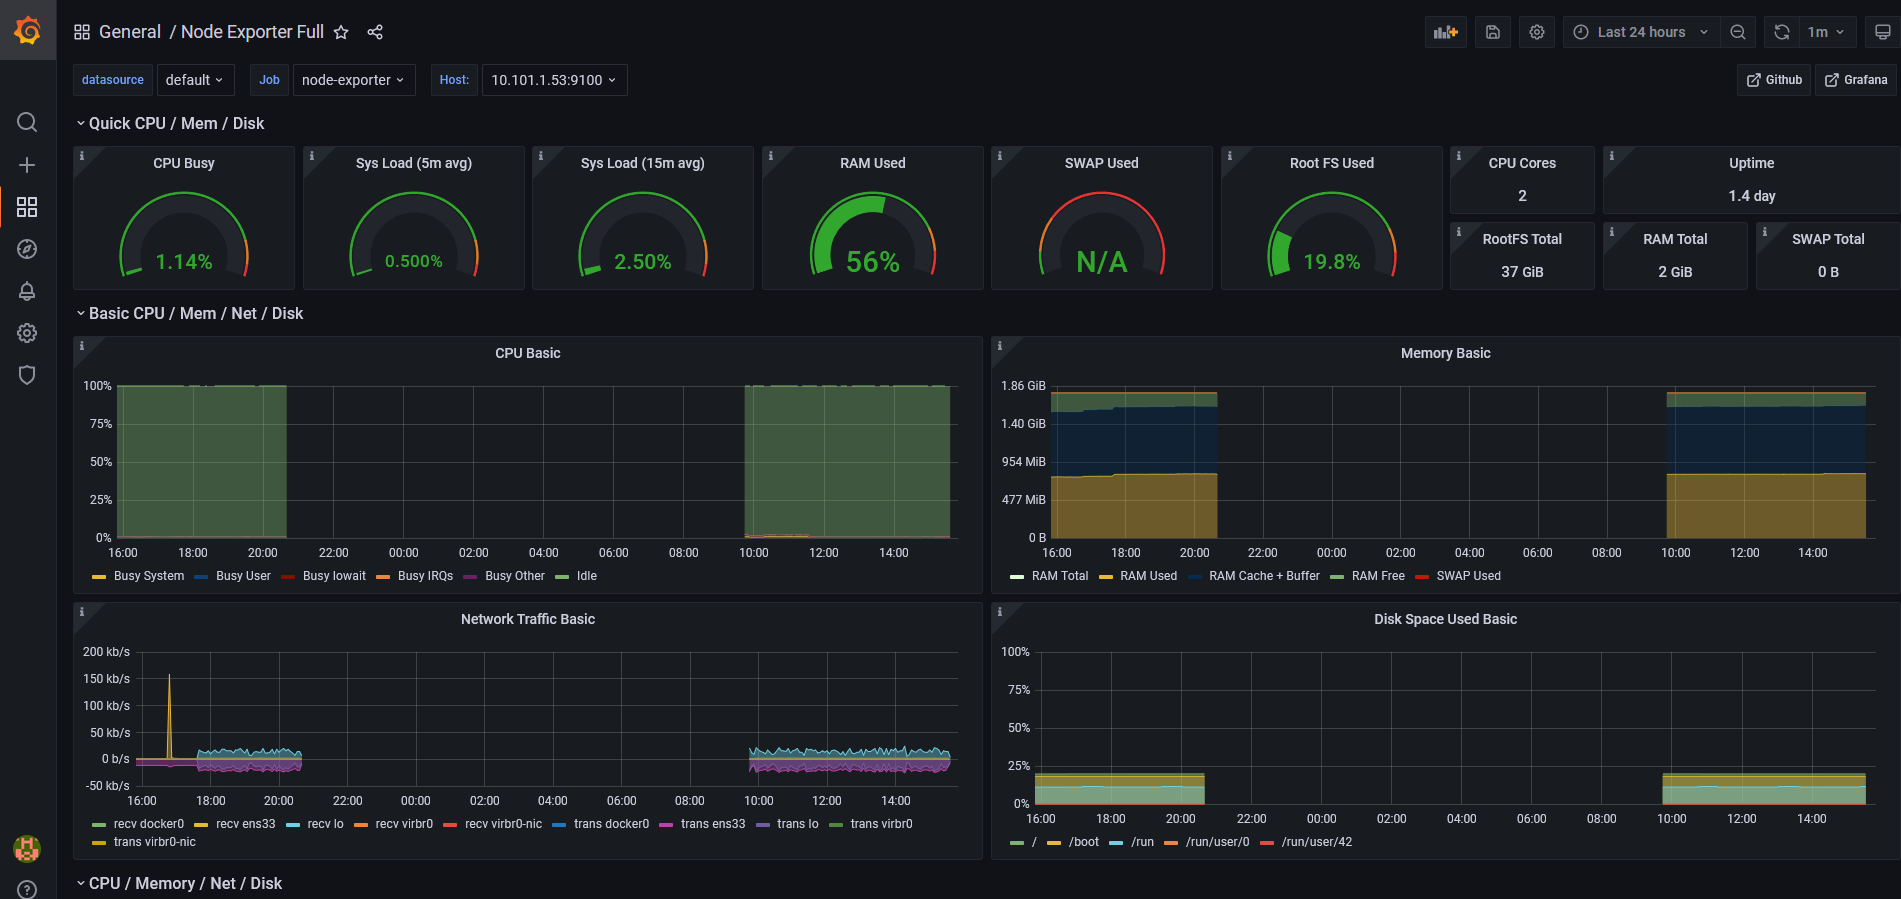
grafana官方图表库有很多优秀的数据图表,可以按需求下载使用。参考网址:https://grafana.com/grafana/dashboards/。 到官网直接搜索数据源为prometheus的dashboard,下载对应的json文件(这些json文件可以看作是开发人员开发的一个监控模板),导入到grafana即可展示。
https://s2.loli.net/2022/01/05/R4vdPrsStMHeban.png

PromQL(Prometheus Query Language)是prometheus自己开发的数据查询DSL语言,语言表现力非常丰富,内置函数很多,在日常数据可视化以及rule告警中都会使用到它。我们把每个查询对象的名字叫做metrics,类似于mysql中的表名。

  • 查询结果
  • 瞬时数据:包含一组时序,每个时序只有一个点,例如:prometheus_http_request_total
  • 区间数据:包含一组时序,每个时序有多个点,例如:prometheus_http_request_total [5m]
  • 纯量数据:纯量只有一个数字,没有时序,例如:count(prometheus_http_request_total)

可以指定label的name查询,还支持算术运算。例如:+,-,*,/,比较运算:==,!=,>,<,<=,>=,逻辑运算and,or,聚合运算:sum,min,max,avg,count,内置函数:rate、irate、abs

常用的查询举例

  • 五分钟的CPU平均使用率:100 - (avg(irate(node_cpu_seconds_total{mode= “idle”}[5m])) * 100)

  • 可用内存百分比:(node_memory_MemAvailable_bytes / (node_memory_MemTotal_bytes)) * 100

  • 磁盘一分钟读的速率:irate(node_disk_reads_completed_total{instance=~"$node"}[1m])

可以结合grafana丰富的dashboard,编辑图表查看PromQL更好的学习PromQL语法。

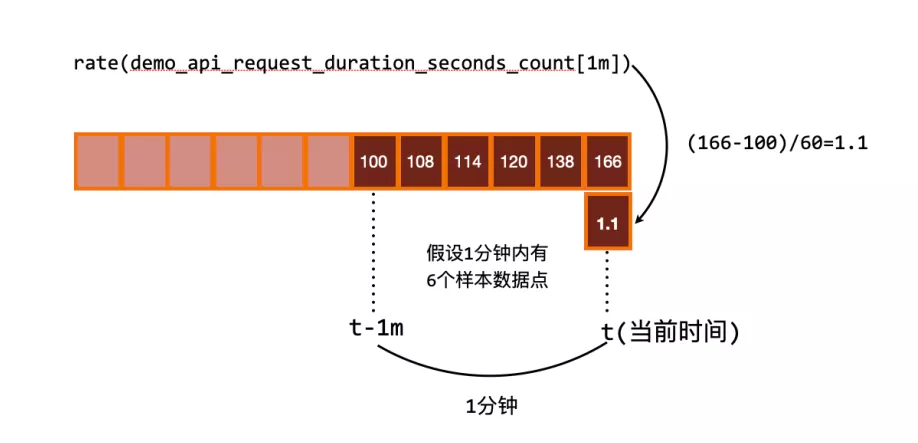
rate会取指定时间范围内所有数据点,算出一组速率,然后取平均值作为结果。

单个counter类型的指标是无意义的,因为其只增不减,且重置就清零了。

rate()函数用于计算在指定时间范围内计数器每秒增加量的平均值。

进行 rate 计算的时候是选择指定时间范围下的第一和最后一个样本进行计算,下图是表示瞬时计算的计算方式:
https://s2.loli.net/2022/01/06/HkJFw7MLlsXxVzn.png

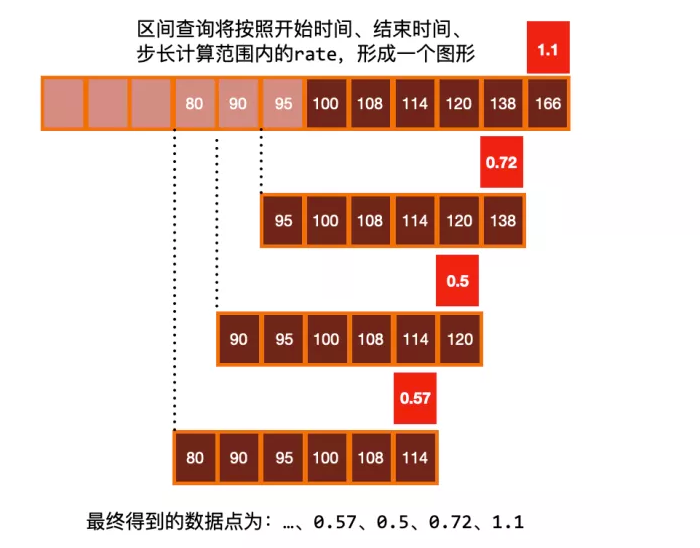
往往我们需要的是绘制一个图形,那么就需要进行区间查询,指定一个时间范围内进行多次计算,将结果串联起来形成一个图形:
https://s2.loli.net/2022/01/06/FfzAhQuEYrasoxO.png

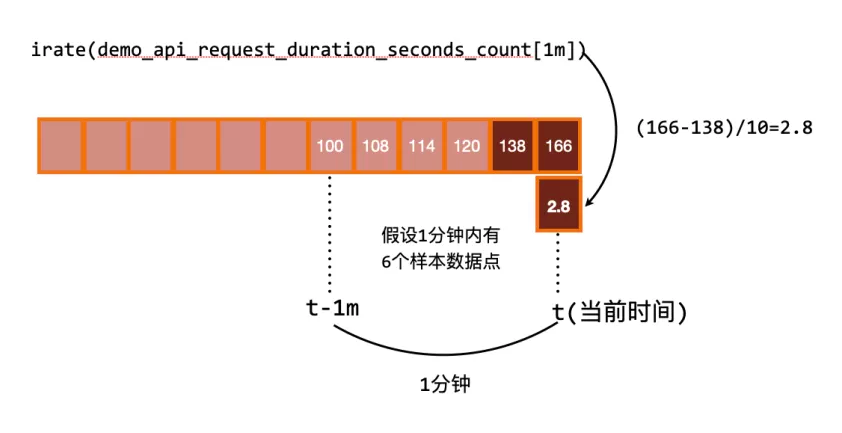
irate取的是在指定时间范围内的最近两个数据点来算速率。

irate 同样用于计算区间向量的计算率,但是其反应出的是瞬时增长率。irate 函数是通过区间向量中最后两个样本数据来计算区间向量的增长速率。这种方式可以避免在时间窗口范围内的长尾问题,并且体现出更好的灵敏度,通过 irate 函数绘制的图标能够更好的反应样本数据的瞬时变化状态。
https://s2.loli.net/2022/01/06/RrPHSzZMeCYTfL3.png

increase()

rate()irate()increase() 函数只能输出非负值的结果,对于跟踪一个可以上升或下降的值的指标(如温度、内存或磁盘空间),可以使用 delta()deriv() 函数来代替。

还有另外一个 predict_linear() 函数可以预测一个 Gauge 类型的指标在未来指定一段时间内的值,例如我们可以根据过去 15 分钟的变化情况,来预测一个小时后的磁盘使用量是多少,可以用如下所示的表达式来查询:

predict_linear(demo_disk_usage_bytes{job="demo"}[15m], 3600)

这个函数可以用于报警,告诉我们磁盘是否会在几个小时候内用完。

  • 部署多个相同配置的server

A和B(甚至可以再加),保持相同的配置,收集相同的数据:
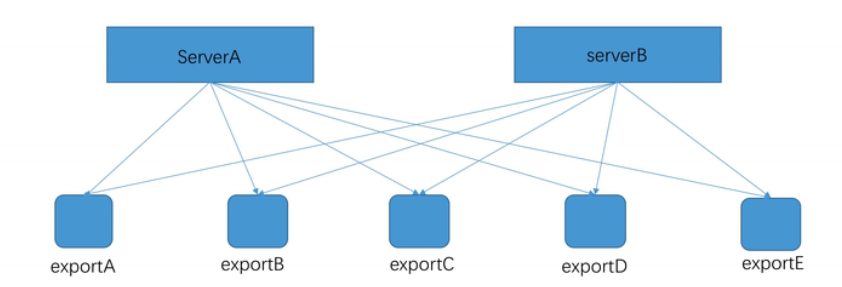
https://s2.loli.net/2022/01/05/GHJFpu9Mm5ZTW2b.png

优点:服务能够提供基本的可靠性;配置非常简单,只要保证配置文件一致即可。

缺点:无法扩展;数据不一致;本质是单点,数据量大的时候,会有性能瓶颈。

适用场景:小规模集群;短期存储的需求。

  • remote storage(远程存储)

如果ServerA出现故障,启动ServerB:
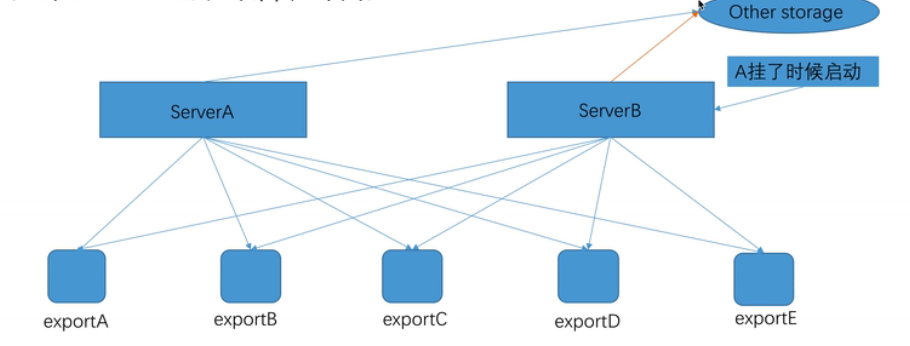
https://s2.loli.net/2022/01/05/vQsHAt8zJhulcb2.png

优点:保证数据一致;数据可长期存储;server 可以灵活迁移。

缺点:server同样是单点,数据量大的时候存在性能瓶颈

适用场景:小规模集群;数据长期存储。

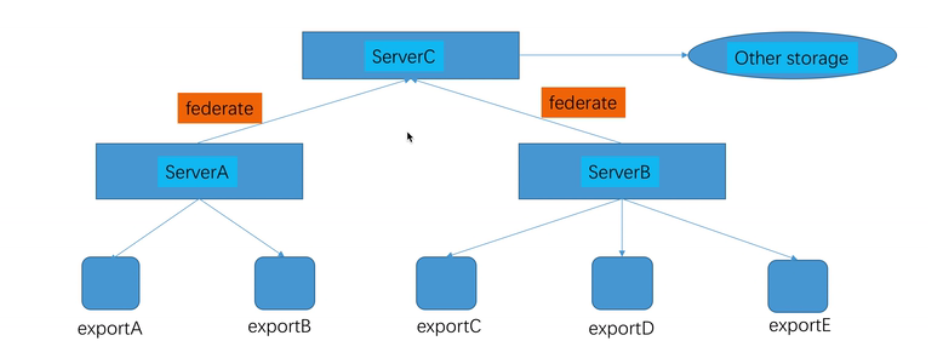
  • 联邦集群

Prometheus原生支持联邦架构,能够实现从别的prometheus来抓取符合特定条件的数据

 1
 2
 3
 4
 5
 6
 7
 8
 9
10
11
12
13
14
15
scrape_configs:
  - job_name: 'federate'
    scrape_interval: 15s

    honor_labels: true
    metrics_path: '/federate'

    params:
      'match[]':
        - '{job=~"kubernetes.*"}'	   # 抓取了目标prometheus中job为kubernetes开头的所有监控项
    static_configs:
      - targets:
        - 'source-prometheus-1:9090'
        - 'source-prometheus-2:9090'
        - 'source-prometheus-3:9090'

https://s2.loli.net/2022/01/05/izAE6CtWgIVTPqs.png

优点:资料能够被持久化保持在第三方存储系统中;能够依旧不同任务进行层级划分;server可以灵活迁移;serverA和serverB可以用前面提到的方法进行高可用扩展。

缺点:单一资料中心带来的单点(ServerC压力较大);分层带来的配置复杂,维护成本较高;监控成本较大。

适用场景:能够满足较大规模的监控需求;有很好地扩展;单资料中心下的较为完善的架构。

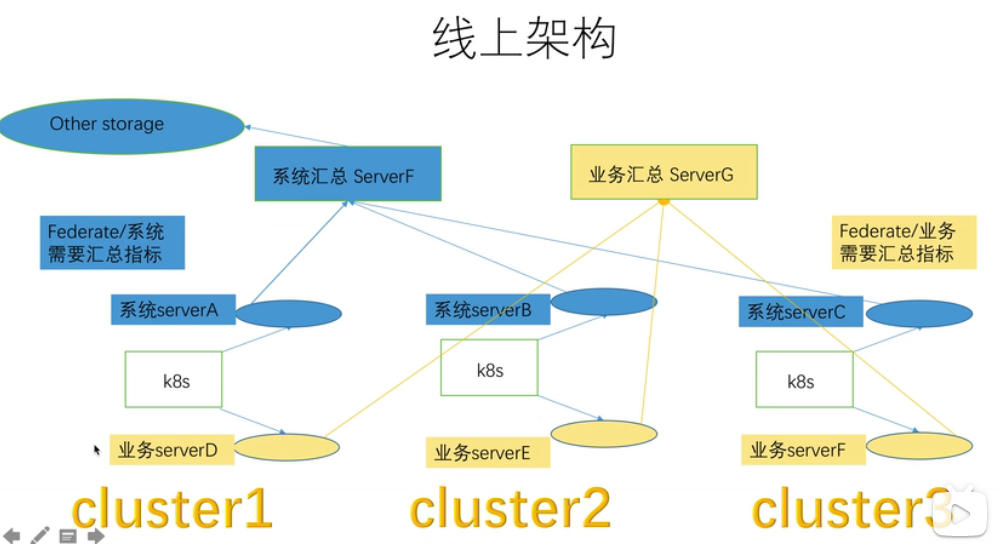
  • 多资料中心高可用架构
  • 多套k8s集群系统监控/cpu、内存、磁盘、网络等数据量不大

  • 业务监控(nginx/grpc等)/和线上访问成正比,数据量巨大

  • 各自特点:

  • 系统监控要保存较长时间(要做长久的资源分析)

  • 业务监控主要做实时探测,一般需求不会超过一星期(主要做实时业务成功率报警,历史数据分析从日志进行操作

  • 多资料中心而且有不同存储需求

https://s2.loli.net/2022/01/05/dSpfcoYkQD7BZja.png

  • 数据模型

    • metrics name & label 指标名称和标签(key=value)的形式组成。如prometheus_http_requests_total{code="200",handler="/api/v1/label/:name/values",instance="localhost:9090",job="prometheus"}
    • 一般由字母和下划线构成,prometheus_http_requests_total(应用名称_监测对象 _ 数值类型 _单位)
    • label(标签)就是对一条时间序列不同维度的识别,每个k-v对都是一个label。
  • counter(计数器类型)

    • counter类型的指标的工作方式和计数器一样,只增不减(除非系统发生了重置)。Counter一般用于累计值,例如记录请求次数、任务完成数,错误发生数。
    • 通常来讲,许多指标counter本身并没有什么意义,有意义的是counter随时间的变化率。
  • Gauge(仪表盘类型)

    • Gauge是可增可减的指标类,可以用于反应当前应用的状态,比如机器内存、磁盘可用空间大小等。node_memory_MemAvailable_bytes/node_file
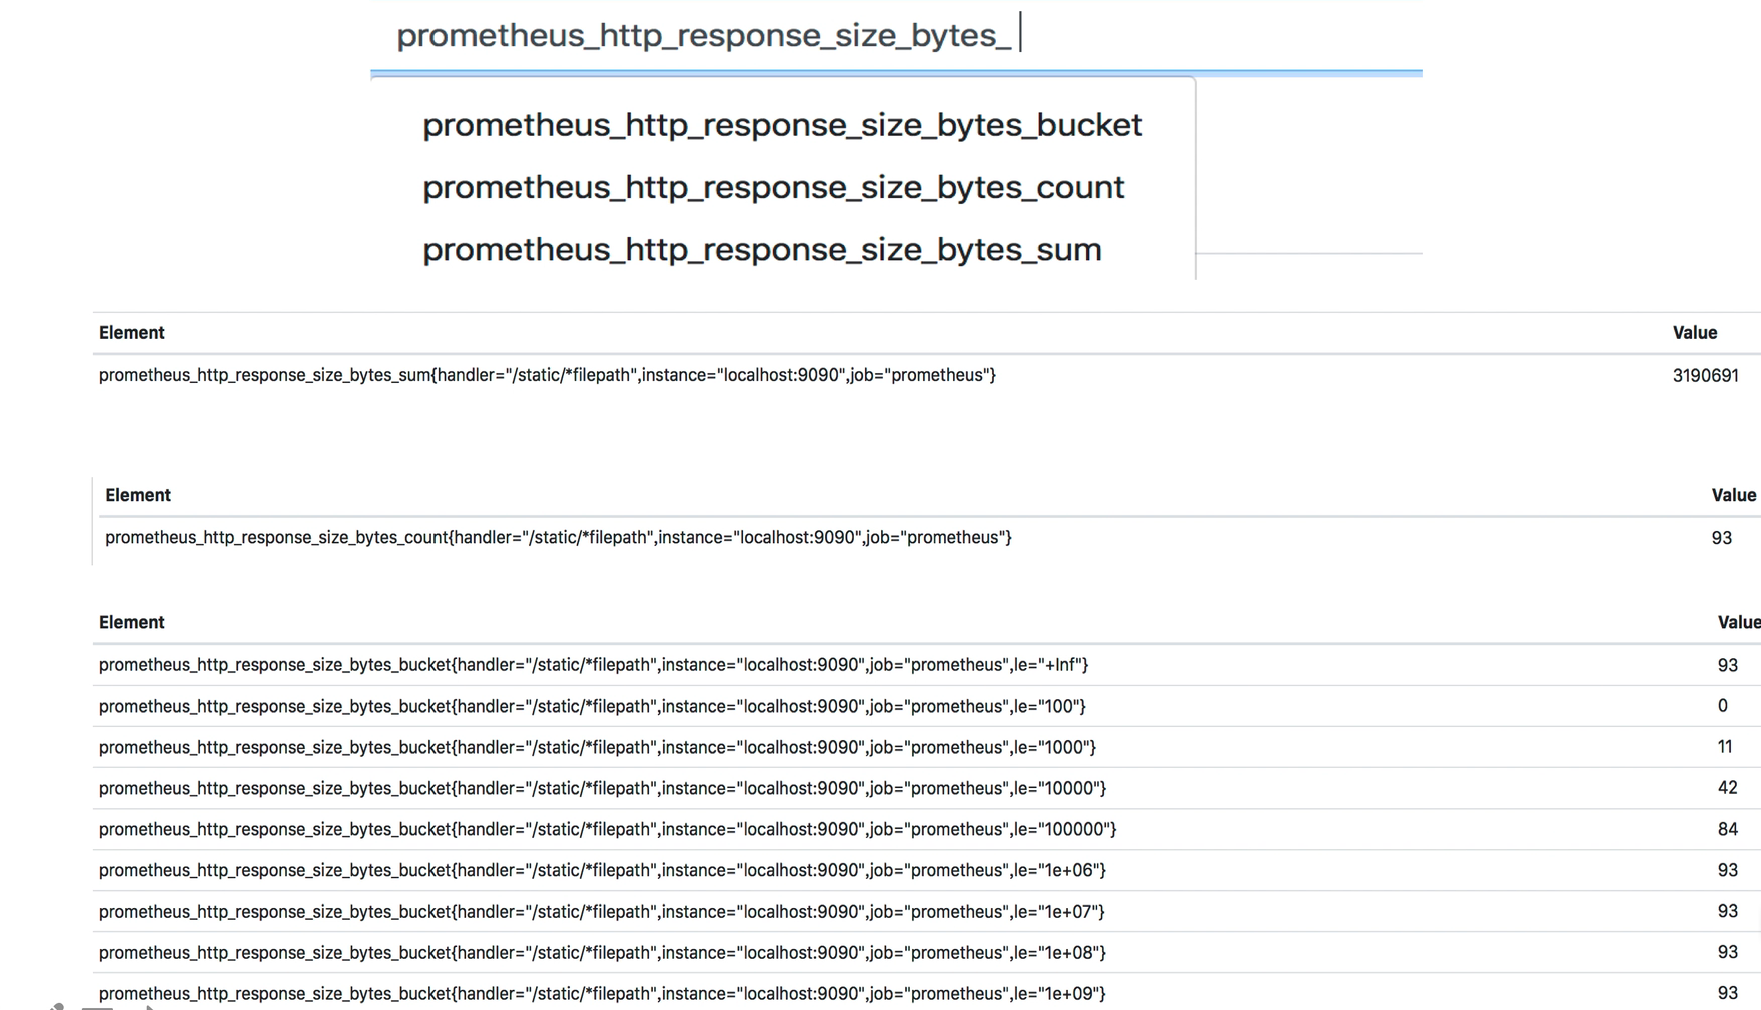
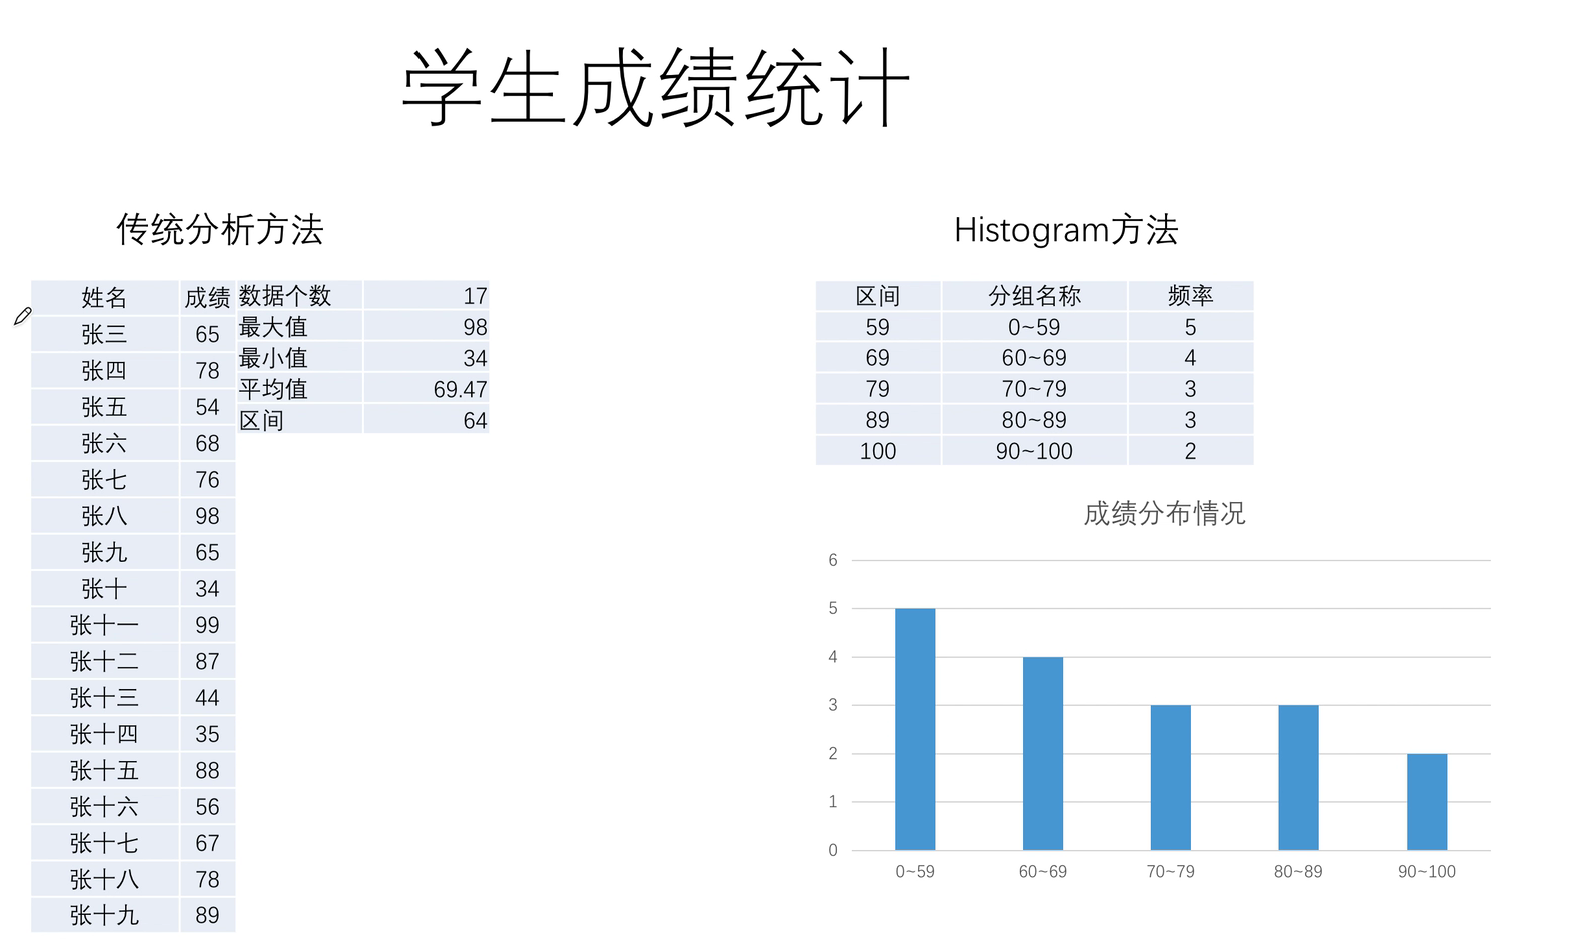
  • Histogram(直方图类型)

    • Histogram由<basename>_bucket,<basename>_sum,<basename>_counter组成。主要用于表示一段时间范围内对数据进行采样(通常是请求持续时间或响应大小),并能够对其指定区间以及总数进行统计,通常它采集的数据展示为直方图。

    • 事件发生的总次数:basename_count。

    • 所有事件产生值的大小的总和:basename_sum.

    • 事件产生的值分布在bucket中的次数。

https://s2.loli.net/2022/01/05/Qc3fGjVobDF86tv.png

https://s2.loli.net/2022/01/05/S4rT8LtNQ3cHDMo.png

  • Summary(摘要类型)

Summary类型和Histogram类型相似,由<basename>{quantile= "<>"},<basename>_sum,<basename>_count,主要用于表示一段时间内数据采样结果(通常是请求持续时间或响应大小),它直接存储了分位数据,而不是根据统计区间计算出来的。
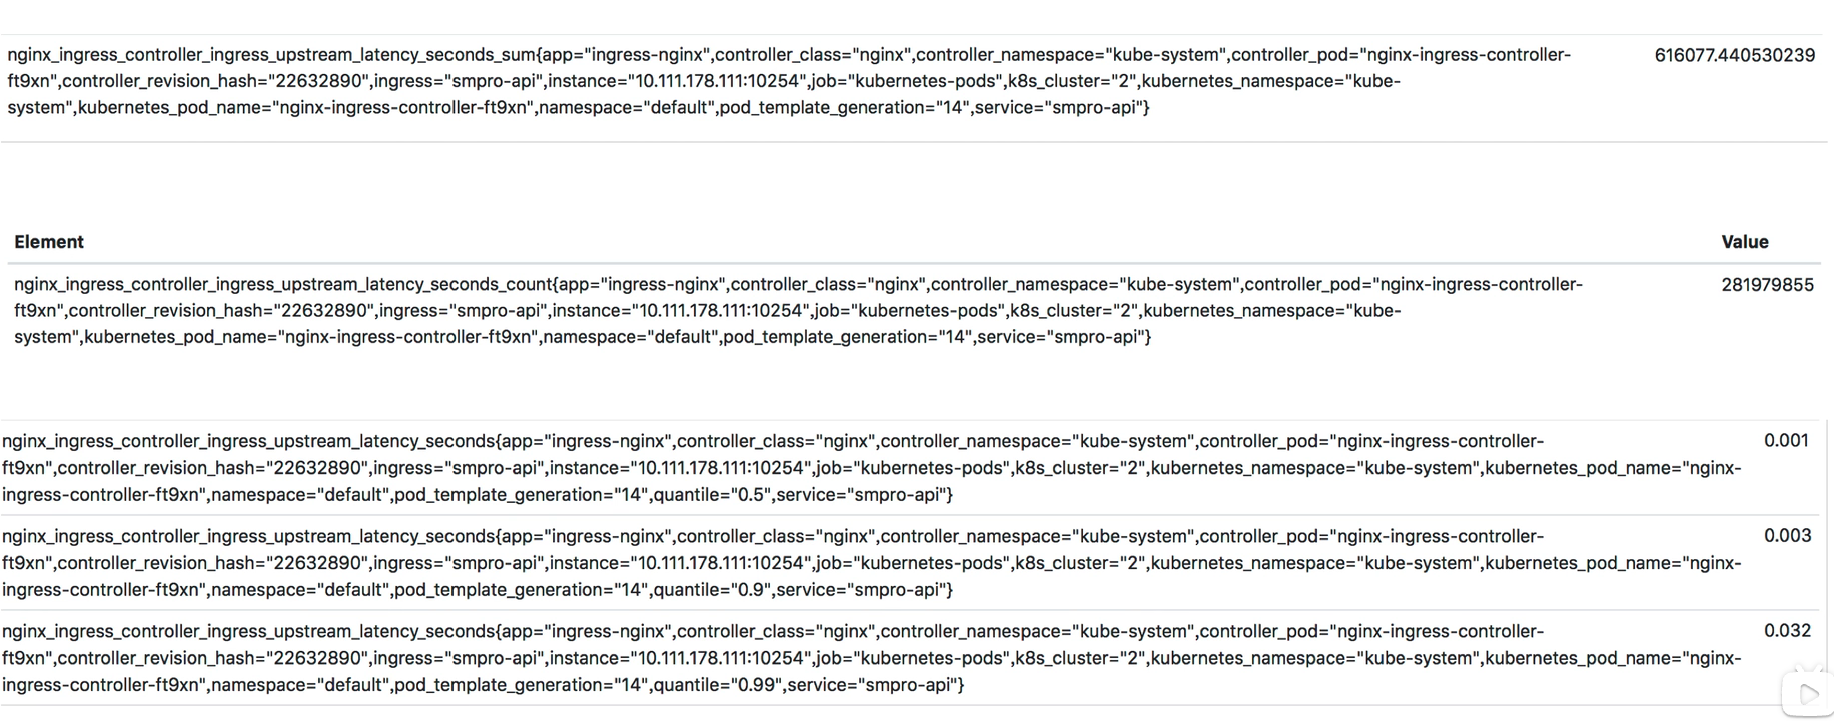
https://s2.loli.net/2022/01/05/XCLNhdwfPoZbzy1.png

  • 二者区别

    • Histogram指标直接反应了在不同区间内样本的个数,区间通过标签le进行定义,同时对于Histogram的指标,我们还可以通过histogram_quantile()函数计算出其值的分位数。
    • 而Summary的分位数则是直接在客户端计算完成。
    • 因此对于分位数的计算而言,Summary在通过PromQL进行查询时有更好的性能表现,而Histogram是在prometheus server上计算的,会消耗更多的资源,反之对于客户端而言Histogram消耗的资源更少。在选择这两种方式时用户应该按照自己的实际场景进行选择。

label(标签)使用

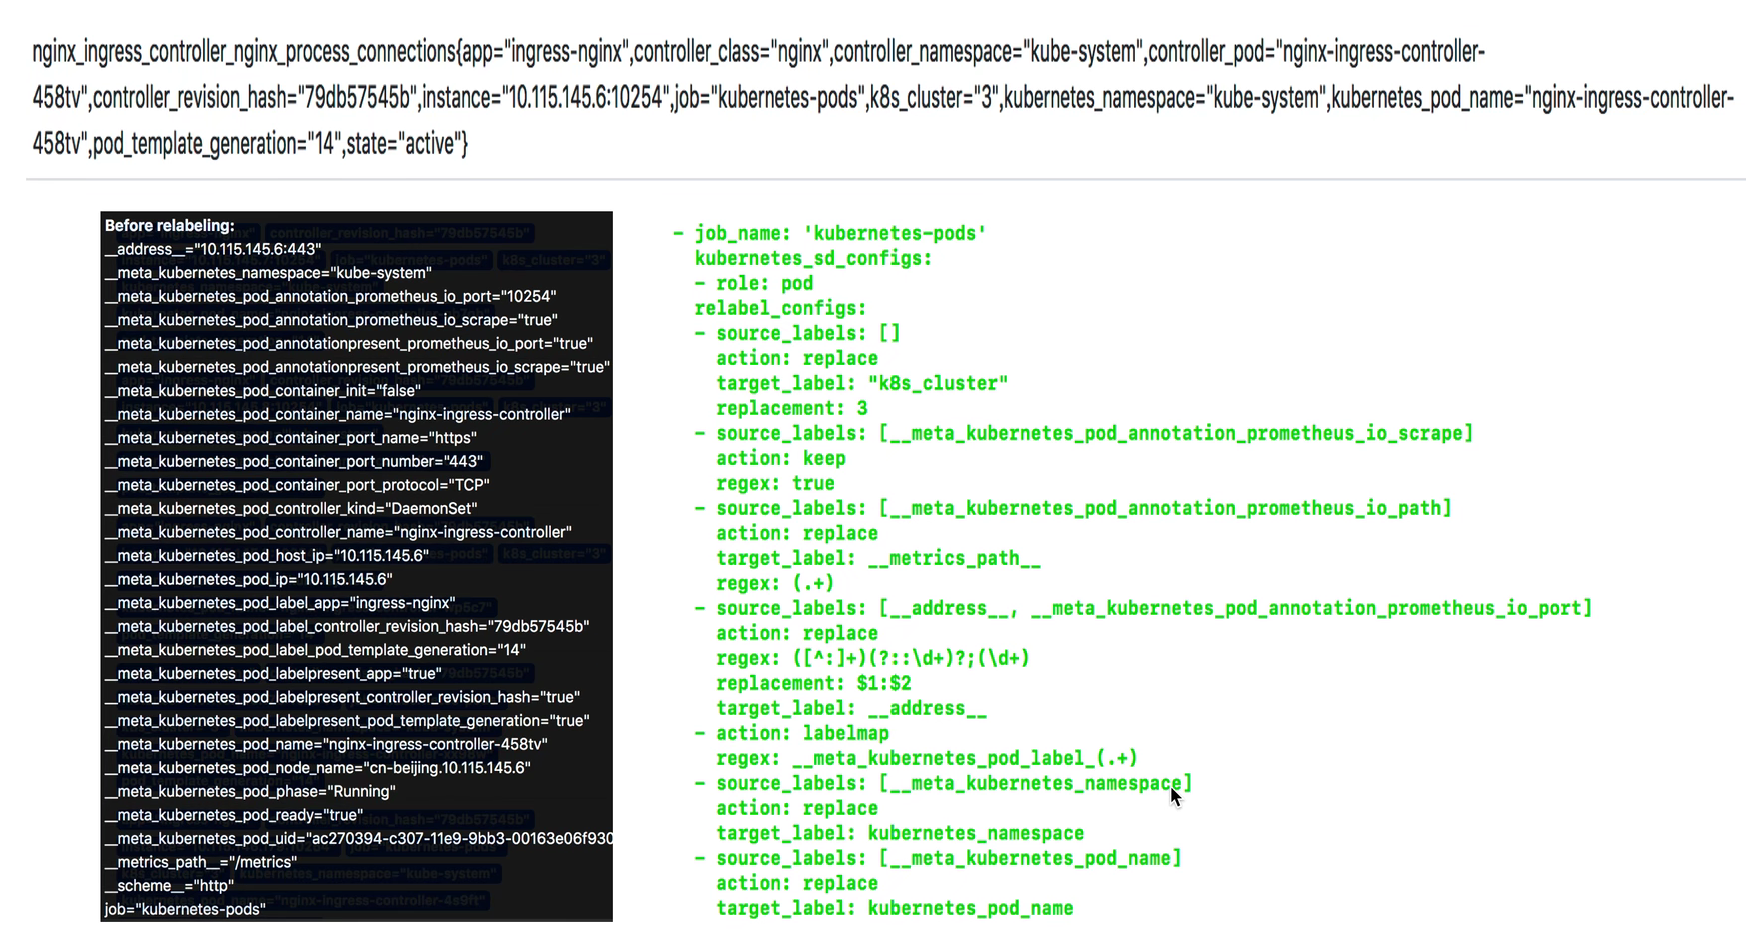
label能够让我们知道监控项目的来源端口方法等,同时label也为prometheus提供了丰富的聚合和查询等功能。可以在targets中看到已有的label有哪些,在实际使用中需要对冗长的label进行格式处理,以更加清晰可读的方式展示出来。

label的操作:

keep 只保留符合匹配的标签;

Drop 丢弃符合匹配的标签;

还支持replace、labelmap、keep、drop等操作

 1
 2
 3
 4
 5
 6
 7
 8
 9
10
11
12
13
14
15
16
17
18
19
20
21
22
23
24
25
26
27
28
29
30
31
32
33
34
# 在Prometheus采集数据之前,通过Target实例的Metadata信息,动态重新写入Label的值。
# 如将原始的__meta_kubernetes_namespace直接写成namespace,简洁明了

- job_name: kubernetes-nodes
  scrape_interval: 1m
  scrape_timeout: 10s
  metrics_path: /metrics
  scheme: https
  kubernetes_sd_configs:
  - api_server: null
    role: node
    namespaces:
      names: []
  bearer_token_file: /var/run/secrets/kubernetes.io/serviceaccount/token
  tls_config:
    ca_file: /var/run/secrets/kubernetes.io/serviceaccount/ca.crt
    insecure_skip_verify: true

  relabel_configs:
  - separator: ;
    regex: __meta_kubernetes_node_label_(.+)
    replacement: $1
    action: labelmap
  - separator: ;
    regex: (.*)
    target_label: __address__
    replacement: kubernetes.default.svc:443
    action: replace
  - source_labels: [__meta_kubernetes_node_name]
    action: replace
    separator: ;
    regex: (.+)
    replacement: /api/v1/nodes/${1}/proxy/metrics
    target_label: __metrics_path__

https://s2.loli.net/2022/01/05/BTMhorUgS5VQXiL.png